This is a hot tent I made for staying warm while doing winter camping snowkiting trips.
I had seen a few different style hot tents at the Winter Camping Symposium . A lot of them were the-style canvas tents. But there were several other styles of tent that intrigued me.


For me, it seemed like there was comprises between all the different styles of tents. There is weight, compactness when packed, ease of setup, interior room, and breathe-ability (All the moisture from breathing and cooking has to go somewhere).
Canvas tents are heavier, more bulky when packed, but have great breathe-ability. The heavier fabric also probably holds the heat in a little better. Coated Nylon tents (like silnylon) are lighter, less bulky, but have no breathe-ability. I think you could use uncoated Nylon, but I’m not as familiar with that.
Wall tents tend to have a A-frame pole structure. This is good because it is pretty much freestanding without the need for stakes (although you do need to stake it down), less flapping of fabric, and you get great interior space. The costs are extra pole weight (as well as lots of extra sewing if you building it your self). The tipi style tents have a single pole to support it in the middle and stakes and tie-downs around the outside. This is lighter, but the cost is less useable interior room. You have areas were you can lay down, but not sit. Other areas around the pole where you can stand.
With the compromises for what I wanted to do, I decided to build a silnylon style tipi. Instead of a tipi with pole in the middle, I built one offset with the pole closer to the zipper. This allowed for an easier time getting into the tent (with the zipper more vertical).
To get the silnylon, the cheapest place I found was Outdoor Wilderness Fabrics. I used 2nd grade silnylon, if you order enough you get the wholesale discount. From what I read it could be slightly heavier, but it worked great for me! From: Quest Outfitters (they had higher prices, so I didn’t go with them) DIFFERNCE BETWEEN 1STS AND 2NDS ON SILNYLON: We sell a hundred yards of 2nds to every 1 yard of 1sts. Every now and then it may be slightly dirty or there may be a mark in the fabric or there may be an extra amount of silicone in the form of a narrow, whitish streak. In other words there may be minor cosmetic imperfections but we won’t sell any silnylon that we feel is structurally compromised unless you know about it ahead of time.
To design the tipi, I tried many paper cut outs, and drawing, but the easier thing was to use a cone layout program. http://www.pulserate.com/ is a shareware utility that worked great for what I wanted to do.

I toss some of my design constraints I had to deal with.
Design Constraint 1: The 60″ width of the fabric.
Design Constraint 2: I wanted to be able to stand in the middle.
Design Constraint 3: Fit 3-4 people sleeping with gear and stove
Design Constraint 4: Minimize sewing. The silnylon is tricky to sew…. although I got much better at it!
I decided to sew up 3 60 widths of fabric and cut the pacman tent shape out of that. That meant in my cone layout program, the width (at the bottom of the screen shot) had to be less than 15 feet (I went with 16.3 feet because I used a bit of scrap at the ends). This meant I need about 19ft*3 = 57 feet of fabric or about 20 yards of silnylon. I think I got 20 yards and that cut it pretty close (I’d leave a bit more room for errors next time).
I exported the cone design into inkscape and put squares for my fabric to make sure it would fit.
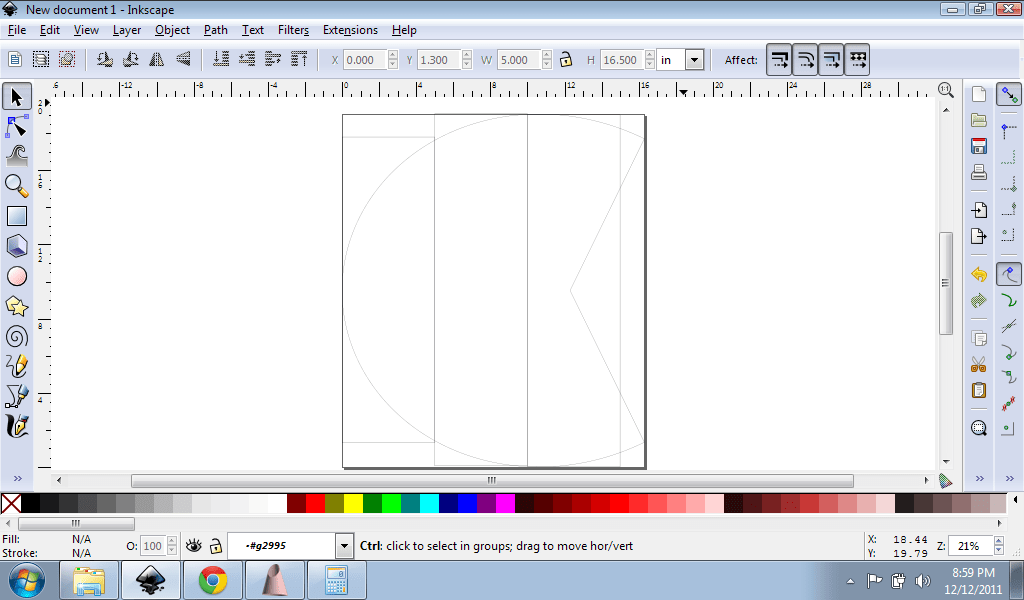
I didn’t get good pictures (bad picture below) of this, but I actually used Nr. of Bends = 11 in the cone layout program, so I got a bunch triangles instead of just the circular shape. I measured all lengths from the center of the tent to the outside, as well as, outside to outside points. This allowed me to be much more accurate when I cut it out. I triangulated all the points I need to cut to, one from the center point and the other from the previous cut point.


I used a mock flat felled seam. For silnylon you don’t have to worry about the threads coming out (because it is completely coated) so you sew a seam with 3/4 allowance, and fold it over and sew the left over to the fabric. You leave the raw fabric edge and it doesn’t look quite as nice… but for me it was far easier. Make sure you put the seam on the inside of the tent.


After cutting out the pacman shape, I sewed a full length #10 zipper with three pulls. One so you can zip up from the bottom and the other two to open a vent hole.

At each bottom section I sewed a coated nylon strip to put snow on to keep the tent from letting in wind and snow. I reinforced all the corners (with some cordura scraps) and put loops to stake it down. I reinforced the apex where the tent pole goes (with cordura also). Sewed in silicone stove jack for the stove.


The tent worked great so far! Can’t want to try it out some more this winter. The few things to change are a few tie outs half way up the tipi to keep it tight and to make some extra space on the inside. Seam seal all the seams (although it doesn’t matter for the blowing snow…. just if it rained).
Hope that help! Send me a picture if you decide to build one!
Bryce
7 Responses
Richard
Thanks for the awesome write-up! I am looking to make one very similar to yours and this page has been really helpful!
Couple of quick questions if you have some time. Was the offset center pole worth it and did the design make it harder to put together? Did you use webbing for the stake holes?
Richard
Finally finished my one… here is some pics from the trial run:
https://fbcdn-sphotos-h-a.akamaihd.net/hphotos-ak-ash3/579546_10200874367475106_773132639_n.jpg
https://fbcdn-sphotos-b-a.akamaihd.net/hphotos-ak-ash3/538982_10200874367515107_1189835910_n.jpg
Thanks once again for your site – it made making this a lot easier!
Shawn
Awesome write up I am currently building my own tipi. What did you decide on for a center pole? I am going back and forth between carbon fiber or aluminum. Also I don’t see anyone talking about where to buy center poles.
Thanks for the write up.
bryce
Hi Shawn,
I used this pole: https://kelty.com/adjustable-pole/ It works very well! I haven’t tried any carbon poles so I don’t know what diameter you’d need. Also to think about is your pole can get warm/hot from the stove so carbon might have issues with that?
Bryce
Shawn
Thanks. I am almost finished with the tipi. I still need center cone and one zipper. I ended up buying my center pole from bear paw wilderness designs. I will try to do a write up when I’m finished
Making a Tipi Style Hot Tent « explorethewind.com
[…] Making a Tipi Style Hot Tent […]
High Tech Winter Camping | | Red Pine Labs
[…] Making a Tipi Style Hot Tent […]